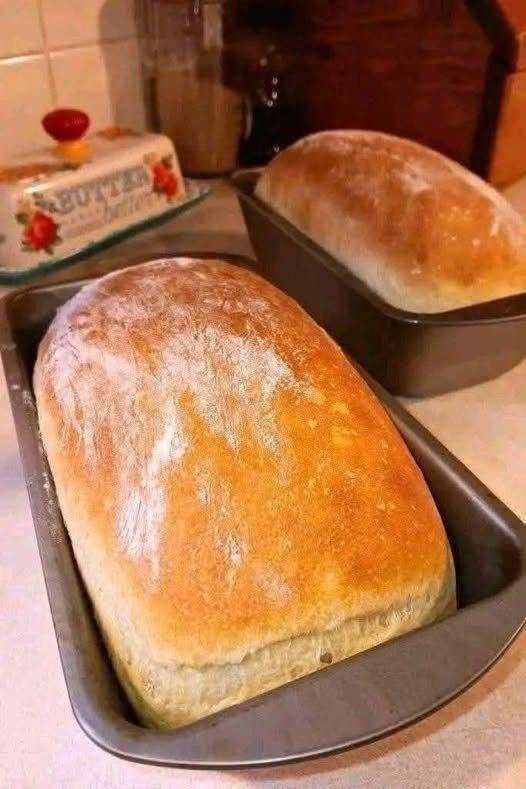
There is something truly magical about baking your own sourdough bread. The moment a freshly baked loaf emerges from the oven with its deeply golden crust and irresistible aroma, every hour spent nurturing the dough feels worthwhile. Sourdough bread is more than just a recipe—it is a tradition that has been enjoyed for thousands of years. Made with a naturally fermented starter instead of commercial yeast, sourdough develops a rich flavor, chewy texture, and beautiful open crumb that cannot be replicated by ordinary bread.
Unlike quick breads that can be prepared in a few hours, sourdough requires patience. The fermentation process allows wild yeast and beneficial bacteria to slowly transform simple ingredients into something extraordinary. While the process may seem intimidating at first, once you understand the basic techniques, sourdough baking becomes a rewarding and enjoyable hobby.
This recipe is designed specifically for home bakers who want to create an artisan-style loaf with a crisp crust, airy interior, and complex flavor. Whether you are completely new to sourdough or looking to improve your skills, this guide will help you create a loaf that looks and tastes like it came from a professional bakery.
Why You’ll Love This Recipe
There are many reasons why sourdough bread remains one of the most beloved breads in the world.
First, the flavor is unmatched. The slow fermentation process creates subtle tangy notes and a depth of flavor that commercial yeast breads simply cannot achieve.
Second, the texture is incredible. The crust becomes beautifully crisp while the inside remains soft, moist, and filled with airy pockets.
Another advantage is that sourdough contains only a few simple ingredients: flour, water, salt, and starter. There are no preservatives or artificial additives, making it a wholesome choice for homemade bread lovers.
Many people also find sourdough easier to digest due to the long fermentation process. While individual experiences vary, the natural fermentation helps break down some compounds found in flour.
Most importantly, baking sourdough is deeply satisfying. Watching a living starter grow, shaping the dough, and pulling a beautiful loaf from the oven creates a sense of accomplishment that few recipes can match.
Ingredients
To make one artisan loaf, you will need:
- 100g active sourdough starter
- 375g warm water
- 450g bread flour
- 50g whole wheat flour
- 10g fine sea salt
Using a digital kitchen scale is highly recommended because accurate measurements are essential for successful bread baking.
Equipment Needed
Before you begin, gather the following equipment:
- Digital kitchen scale
- Large mixing bowl
- Dough scraper or bench scraper
- Proofing basket (banneton)
- Sharp razor blade or bread lame
- Dutch oven with lid
- Parchment paper
- Cooling rack
Having the right equipment helps ensure consistent and professional-looking results.
Understanding the Sourdough Starter
A sourdough starter is a living culture of flour and water that contains wild yeast and beneficial bacteria. It serves as the natural leavening agent for the bread.
Before making this recipe, your starter should be active, bubbly, and recently fed. A healthy starter typically doubles in size within several hours after feeding and has a pleasant tangy aroma.
Many bakers perform a simple float test by placing a small spoonful of starter into water. If it floats, it is generally ready to use.
A strong starter is one of the most important factors in achieving a successful loaf.
Step 1: Build the Levain
Several hours before mixing the dough, prepare your levain.
Combine a portion of active starter with flour and water. Stir until fully mixed and leave it at room temperature.
Over the next few hours, the mixture will become bubbly and increase in volume. This process strengthens the yeast activity and prepares it for the main dough.
When the levain has doubled in size and appears airy and active, it is ready to use.
Step 2: Autolyse the Dough
In a large mixing bowl, combine the bread flour and whole wheat flour.
Add the warm water and mix until no dry flour remains.
The dough will appear rough and shaggy at this stage, which is completely normal.
Cover the bowl and allow the mixture to rest for 30 to 60 minutes.
This resting period, known as autolyse, allows the flour to absorb water fully. It also encourages gluten development, resulting in stronger dough and a more open crumb structure.
Although this step is simple, it makes a significant difference in the final loaf.
Step 3: Add the Starter and Salt
Once the autolyse is complete, add the active levain to the dough.
Using wet hands, gently squeeze and fold the dough until the starter is fully incorporated.
Allow the dough to rest briefly before adding the salt.
Sprinkle the salt evenly across the surface and add a small splash of water if necessary.
Continue folding and mixing until the salt is completely incorporated.
The dough should now feel smoother and more cohesive than before.
Step 4: Bulk Fermentation
Bulk fermentation is where much of the flavor and structure develop.
Cover the bowl and allow the dough to rise at room temperature for approximately four to six hours.
During the first few hours, perform a series of stretch-and-fold or coil-fold techniques every 30 minutes.
To perform a coil fold, gently lift one side of the dough and fold it over itself. Rotate the bowl and repeat several times.
These folds strengthen the gluten network without aggressively kneading the dough.
As fermentation progresses, the dough becomes smoother, stronger, and more elastic.
By the end of bulk fermentation, the dough should appear slightly puffy and show visible air bubbles throughout.
Step 5: Pre-Shaping
Lightly flour your work surface and gently turn the dough out of the bowl.
Using a bench scraper, shape the dough into a loose round.
Avoid handling the dough too aggressively because you want to preserve the gas bubbles created during fermentation.
Allow the dough to rest uncovered for approximately 20 to 30 minutes.
This stage, known as the bench rest, allows the gluten to relax and makes final shaping easier.
Step 6: Final Shaping
After the bench rest, perform the final shaping.
Gently flatten the dough and fold the edges toward the center to create tension.
Turn the dough seam-side down and use a circular motion to tighten the outer surface.
Creating surface tension is important because it helps the loaf maintain its shape during proofing and baking.
A properly shaped loaf will rise upward rather than spreading outward.
Step 7: Cold Proof Overnight
Prepare a proofing basket by dusting it generously with flour.
Place the shaped dough seam-side up into the basket.
Cover the dough and transfer it to the refrigerator.
Allow it to proof overnight for 12 to 16 hours.
This cold fermentation period is one of the secrets to exceptional sourdough flavor. The extended fermentation develops complex tangy notes while improving oven spring and overall texture.
Step 8: Preheat the Oven
The next morning, place your Dutch oven inside the oven and preheat to 475°F (245°C).
Allow the Dutch oven to heat for at least 45 minutes.
A thoroughly heated Dutch oven creates steam during baking, which helps develop a beautifully crisp crust.
Proper preheating is essential for maximum oven spring.
Step 9: Score the Dough
Remove the dough from the refrigerator and carefully invert it onto parchment paper.
Using a sharp blade or bread lame, make one confident slash across the top.
Scoring allows controlled expansion during baking and creates the signature artisan appearance associated with sourdough bread.
The score also prevents random cracks from forming on the surface.
Step 10: Bake the Bread
Carefully transfer the dough into the hot Dutch oven.
Cover with the lid and bake for 25 minutes.
During this stage, trapped steam helps the loaf rise dramatically and develop a glossy crust.
After 25 minutes, remove the lid and reduce the temperature slightly.
Continue baking for an additional 20 to 25 minutes until the crust becomes deep golden brown.
The finished loaf should sound hollow when tapped on the bottom.
Step 11: Cool Completely
Transfer the bread to a wire rack and allow it to cool completely.
This step requires patience but is extremely important.
Freshly baked bread continues cooking internally as it cools. Cutting into it too early can result in a gummy texture.
For best results, wait at least three hours before slicing.
Serving Suggestions
Sourdough bread is incredibly versatile and pairs well with countless foods.
Serve it with:
- Butter and jam
- Soups and stews
- Sandwiches
- Cheese boards
- Avocado toast
- Scrambled eggs
- Olive oil and balsamic vinegar
Its rich flavor makes even simple meals feel special.
Storage Tips
Store sourdough bread at room temperature in a paper bag or bread box.
Avoid refrigeration, as it can cause the bread to dry out more quickly.
For longer storage, slice the loaf and freeze individual pieces. Simply toast frozen slices whenever needed.
Final Thoughts
Making artisan sourdough bread is a rewarding experience that combines science, patience, and craftsmanship. While the process takes time, the results are truly extraordinary. The crisp crust, airy crumb, and rich tangy flavor make every step worthwhile.
Whether you are baking your very first loaf or continuing your sourdough journey, this recipe provides a reliable foundation for success. With practice, you’ll develop confidence in handling the dough and gain a deeper appreciation for the traditional art of bread making.
Once you experience the satisfaction of slicing into a homemade sourdough loaf and hearing the crackle of its crust, you’ll understand why sourdough baking has captivated bakers around the world for generations. Happy baking!