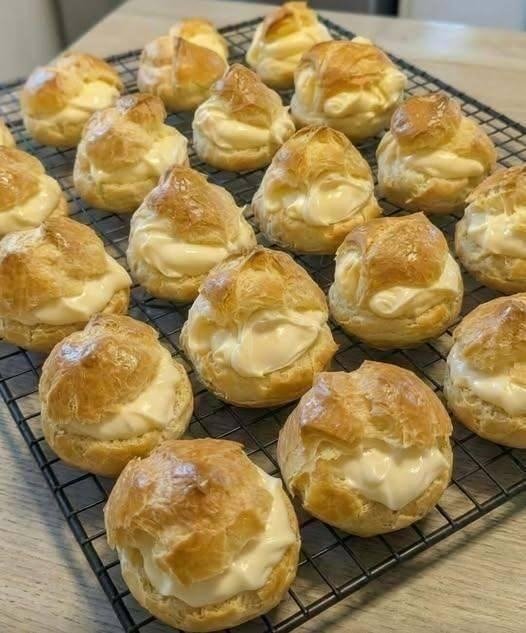
Few desserts can match the elegance and charm of homemade Custard-Filled Cream Puffs. These delicate pastries feature light and airy choux pastry shells filled with rich, silky vanilla custard that melts in your mouth with every bite. Although cream puffs often look like something you would only find in a professional bakery or French pastry shop, they are surprisingly simple to make at home with basic ingredients and a little patience.
The contrast between the crisp golden pastry shell and the smooth creamy filling creates a dessert that feels luxurious without being overly heavy. Whether served at afternoon tea, holiday gatherings, birthday parties, bridal showers, or elegant dinner parties, cream puffs always make a lasting impression.
Originating from French pastry traditions, cream puffs have been enjoyed for centuries and remain one of the most beloved desserts worldwide. Their beautiful appearance, delicate texture, and rich flavor make them a timeless favorite for bakers and dessert lovers alike.
The best part is that this recipe requires only a handful of simple ingredients and can be mastered even by home bakers with limited experience. Once you learn the technique of making choux pastry, you’ll discover just how rewarding it is to create these bakery-style treats in your own kitchen.
Why You’ll Love This Recipe
There are many reasons why these Custard-Filled Cream Puffs deserve a place in your dessert collection.
First, they look incredibly impressive despite being made from simple ingredients. Their elegant appearance makes them perfect for special occasions and celebrations.
Second, the texture is absolutely irresistible. The shells are crisp on the outside while remaining light and airy inside, creating the perfect contrast to the silky vanilla custard filling.
Another advantage is their versatility. You can enjoy them plain, dusted with powdered sugar, drizzled with chocolate sauce, or even filled with different flavored creams.
Unlike many complicated pastries, cream puffs require no fancy equipment. A saucepan, mixing bowl, baking sheet, and a few basic kitchen tools are all you need.
Most importantly, they taste amazing. Every bite combines buttery pastry with rich vanilla custard, creating a dessert that feels both light and indulgent at the same time.
Ingredients
For the Choux Pastry Shells
- ½ cup water (120ml)
- ½ cup whole milk (120ml)
- ½ cup unsalted butter, cubed (115g)
- 1 tablespoon granulated sugar
- ¼ teaspoon salt
- 1 cup all-purpose flour (125g)
- 4 large eggs, room temperature
For the Vanilla Custard Filling
- 2 cups whole milk (480ml)
- ½ cup granulated sugar (100g)
- 4 egg yolks
- ¼ cup cornstarch (30g)
- 1 teaspoon pure vanilla extract
- Pinch of salt
Optional Toppings
- Powdered sugar
- Chocolate sauce
- Caramel drizzle
- Fresh berries
Equipment Needed
Before beginning, gather the following kitchen tools:
- Medium saucepan
- Mixing bowls
- Wooden spoon
- Whisk
- Baking sheets
- Parchment paper
- Cooling rack
- Spoon or piping bag
Having everything ready beforehand will make the process much smoother.
Understanding Choux Pastry
Choux pastry, also known as pâte à choux, is a unique dough used to make cream puffs, éclairs, profiteroles, and other classic French pastries.
Unlike traditional pastry dough, choux pastry relies on steam rather than baking powder or yeast to rise. As the dough bakes, moisture inside the pastry turns into steam, causing the shells to puff up dramatically and create hollow centers perfect for filling.
Although it may seem intimidating, the process is actually quite straightforward when you follow each step carefully.
Step 1: Prepare the Oven
Begin by preheating your oven to 425°F (220°C).
Line two baking sheets with parchment paper.
A properly preheated oven is essential because the initial burst of heat creates the steam needed for the pastry to rise.
Avoid skipping this step, as temperature plays a major role in achieving perfectly puffed shells.
Step 2: Make the Choux Dough
In a medium saucepan, combine the water, milk, butter, sugar, and salt.
Place the saucepan over medium heat and bring the mixture to a rolling boil.
Once boiling, immediately remove the pan from the heat.
Add the flour all at once and stir vigorously using a wooden spoon.
Continue mixing until a smooth dough forms.
The dough should pull away from the sides of the pan and come together into a ball.
Return the pan to low heat and cook for two to three minutes while stirring constantly.
This step helps remove excess moisture and creates the proper texture for the pastry.
Allow the dough to cool for approximately five minutes before adding the eggs.
Step 3: Add the Eggs
Add the eggs one at a time, mixing thoroughly after each addition.
At first, the dough may appear separated or slippery, but continue mixing and it will come together.
After all the eggs have been incorporated, the dough should become smooth, glossy, and thick enough to hold its shape while remaining soft enough to pipe or spoon.
This consistency is essential for achieving light and airy cream puffs.
Step 4: Shape the Cream Puffs
Using a spoon or piping bag, place mounds of dough onto the prepared baking sheets.
Leave enough space between each puff because they will expand significantly during baking.
Try to keep the portions uniform in size so they bake evenly.
If desired, smooth any pointed tops with a damp fingertip to create a more rounded appearance.
Step 5: Bake the Shells
Place the baking sheets in the oven and bake at 425°F (220°C) for 15 minutes.
Without opening the oven door, reduce the temperature to 350°F (175°C).
Continue baking for an additional 20 to 25 minutes until the puffs are deeply golden brown and feel firm.
Avoid opening the oven during baking because sudden temperature changes can cause the shells to collapse.
The cream puffs should feel light and hollow when lifted.
Step 6: Cool the Shells Properly
Turn off the oven and slightly crack the door open.
Allow the cream puffs to remain inside for approximately 10 minutes.
This gradual cooling process helps prevent collapse.
Remove the puffs from the oven and immediately poke a small hole in each one using a toothpick.
This releases trapped steam and helps maintain their crisp texture.
Transfer them to a cooling rack and allow them to cool completely.
Step 7: Prepare the Vanilla Custard
While the shells cool, begin making the custard filling.
In a saucepan, heat the milk until it becomes steaming hot but not boiling.
Meanwhile, whisk together the egg yolks, sugar, cornstarch, and salt in a separate bowl.
Continue whisking until the mixture becomes pale and smooth.
Slowly pour the hot milk into the egg mixture while whisking continuously.
Adding the milk gradually prevents the eggs from scrambling.
Once combined, return the mixture to the saucepan.
Cook over medium heat while whisking constantly.
Within a few minutes, the custard will begin to thicken.
Continue cooking until it reaches a smooth pudding-like consistency and begins bubbling gently.
Remove from heat and stir in the vanilla extract.
The aroma at this stage is absolutely wonderful.
Step 8: Chill the Custard
Transfer the custard to a bowl.
Place plastic wrap directly against the surface to prevent a skin from forming.
Refrigerate for at least one hour or until fully chilled.
Cold custard is easier to pipe and provides the best texture for filling the cream puffs.
Step 9: Fill the Cream Puffs
Once both the shells and custard are completely cooled, it’s time for assembly.
Slice each cream puff in half horizontally.
Spoon or pipe the chilled custard generously into the bottom half of each shell.
Place the top half back on carefully.
The contrast between the crisp shell and silky filling creates the perfect bite.
Decorating and Serving
For an elegant finish, dust the tops lightly with powdered sugar.
You can also drizzle them with chocolate sauce, caramel sauce, or melted chocolate.
Fresh strawberries, raspberries, or blueberries make beautiful garnishes and add a refreshing contrast to the rich custard.
Serve immediately for the best texture and flavor.
Storage Tips
Store filled cream puffs in an airtight container in the refrigerator for up to two days.
Because the custard contains dairy and eggs, refrigeration is essential.
If possible, store the shells and custard separately and assemble shortly before serving for maximum crispness.
Unfilled shells can be frozen for several weeks and refreshed in a warm oven before use.
Helpful Tips for Success
For the best cream puffs, remember these important tips:
- Use room-temperature eggs.
- Do not open the oven while baking.
- Cook the dough properly before adding eggs.
- Allow the shells to cool completely.
- Chill the custard thoroughly.
- Use high-quality vanilla extract.
- Fill just before serving when possible.
- Pipe evenly sized portions.
Final Thoughts
Custard-Filled Cream Puffs are proof that elegant desserts don’t have to be complicated. With their crisp golden shells, light airy centers, and rich vanilla custard filling, these classic French pastries deliver bakery-quality results right from your own kitchen.
Perfect for celebrations, afternoon tea, holidays, or simply treating yourself to something special, cream puffs are a dessert that never goes out of style. Their delicate texture, beautiful appearance, and irresistible flavor make them a favorite among dessert lovers of all ages.
Once you master this recipe, you’ll discover just how rewarding homemade pastry can be. From the first golden puff that emerges from the oven to the final bite of creamy custard-filled goodness, every step is worth the effort. Enjoy sharing these delightful treats with family and friends, and don’t be surprised when everyone asks for the recipe.