There’s something incredibly satisfying about baking a fresh loaf of bread at home. The aroma that fills the kitchen, the golden crust forming in the oven, and the soft slices waiting to be enjoyed make homemade bread one of the most rewarding baking projects. If you want to take your bread baking to the next level, this Easy Homemade Green Bread Loaf is the perfect recipe to try.
This unique loaf combines the classic comfort of homemade bread with a vibrant green color that makes it stand out from ordinary loaves. Whether you use matcha powder, pandan extract, spinach powder, or natural food coloring, the result is a stunning loaf that looks as amazing as it tastes. The bread has a soft and fluffy interior, a lightly crisp crust, and a mild flavor that pairs wonderfully with both sweet and savory toppings.
Perfect for breakfast, afternoon snacks, sandwiches, or special occasions, this green bread loaf is guaranteed to impress family and friends. Best of all, the recipe is beginner-friendly and requires only simple ingredients that are easy to find.
Why You’ll Love This Green Bread Loaf
There are many reasons why this recipe deserves a place in your baking collection.
First, it has a beautiful appearance that instantly catches attention. The vibrant green color creates a unique visual effect that makes every slice look special.
Second, the texture is wonderfully soft and fluffy. Thanks to proper kneading and rising time, the loaf develops a light and airy crumb that stays fresh for days.
Another reason to love this bread is its versatility. It can be served with butter and jam for breakfast, transformed into delicious sandwiches for lunch, or toasted and enjoyed with tea or coffee.
The recipe is also freezer-friendly, making it easy to prepare ahead of time and enjoy whenever needed.
Ingredients
For one large loaf, you will need:
- 4 cups bread flour
- 2¼ teaspoons instant yeast
- 2 tablespoons sugar
- 1 teaspoon salt
- 1 cup warm milk
- ¼ cup warm water
- 2 tablespoons vegetable oil
- 1 tablespoon matcha powder or pandan powder
- 1 teaspoon vanilla extract (optional)
For topping:
- Extra flour for dusting
Equipment Needed
Before starting, gather the following equipment:
- Large mixing bowl
- Measuring cups and spoons
- Loaf pan or baking tray
- Kitchen towel
- Cooling rack
Having everything prepared beforehand makes the baking process much smoother and more enjoyable.
Step 1: Activate the Yeast
Begin by combining the warm water, warm milk, sugar, and yeast in a large mixing bowl.
Allow the mixture to sit for about 5 to 10 minutes. During this time, the yeast should become foamy and bubbly.
This step is important because it confirms that the yeast is active and capable of helping the bread rise properly. If no foam appears, the yeast may be expired and should be replaced.
Step 2: Prepare the Dough
Once the yeast mixture becomes foamy, add the vegetable oil and matcha powder.
Whisk thoroughly until the green color is evenly distributed throughout the liquid mixture.
Gradually add the bread flour and salt while mixing continuously. Continue stirring until a rough dough begins to form.
Transfer the dough onto a lightly floured surface and begin kneading.
Knead the dough for approximately 8 to 10 minutes. As you work the dough, it will gradually become smooth, elastic, and slightly stretchy.
A properly kneaded dough should feel soft but not overly sticky. If it sticks excessively, add a small amount of flour. If it feels too dry, add a teaspoon of water.
Step 3: First Rise
Place the dough into a lightly greased bowl.
Cover the bowl with a clean kitchen towel or plastic wrap.
Allow the dough to rise in a warm location for about 1 to 1½ hours.
During this time, the yeast produces gas bubbles that help the dough expand. The dough should roughly double in size before moving to the next step.
This first rise is essential for developing both flavor and texture.
Step 4: Shape the Loaf
Once the dough has doubled in size, gently press it down to release excess air.
Transfer the dough to a lightly floured work surface.
Shape it into a smooth loaf by folding the edges inward and rolling it into the desired shape.
Place the dough into a greased loaf pan or onto a baking tray lined with parchment paper.
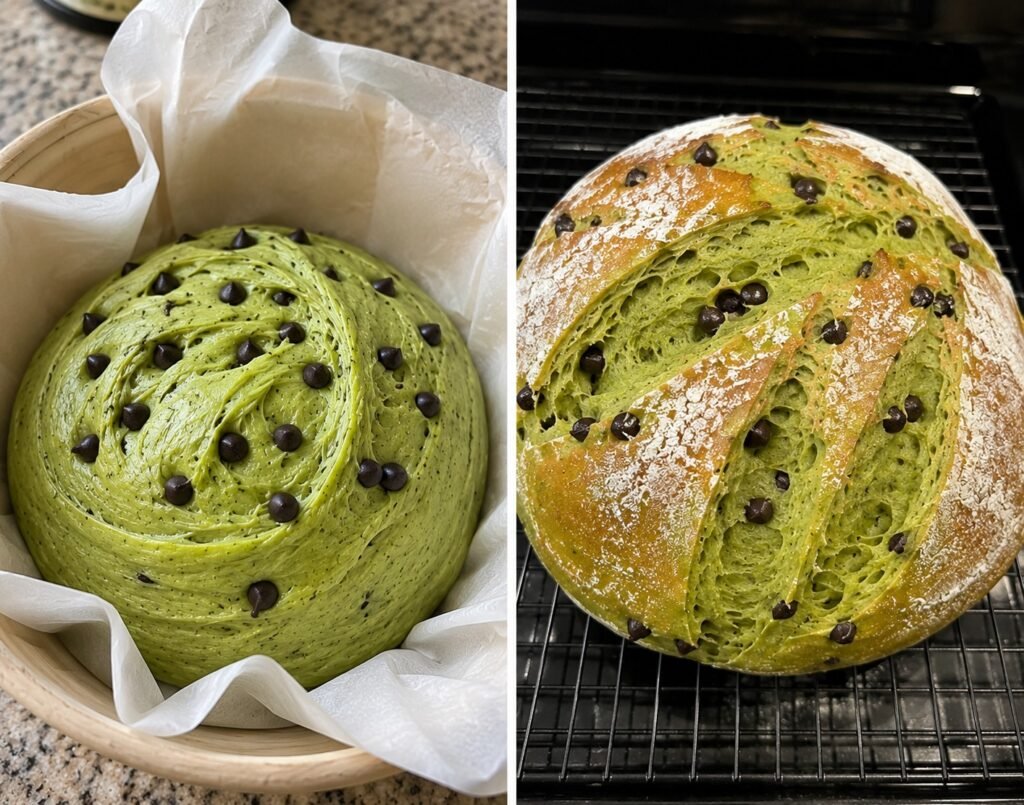
For a rustic artisan appearance, lightly dust the top with flour.
Step 5: Second Rise
Cover the shaped loaf and allow it to rise again for approximately 30 to 45 minutes.
The dough will become noticeably puffier and lighter.
This second proofing stage creates the airy structure that gives homemade bread its soft texture.
Avoid rushing this step, as proper proofing significantly improves the final result.
Step 6: Score the Dough
Using a sharp knife or bread lame, carefully score the top of the loaf.
Scoring serves both decorative and practical purposes. It allows the bread to expand properly during baking and creates an attractive bakery-style appearance.
Popular scoring patterns include:
- One long slash
- Cross pattern
- Leaf design
- Traditional artisan cuts
Choose whichever design you prefer.
Step 7: Bake the Bread
Preheat your oven to 375°F (190°C).
Place the loaf on the center oven rack.
Bake for 30 to 35 minutes.
As the bread bakes, the crust develops a beautiful golden-brown color while the interior remains vibrantly green.
You will know the bread is finished baking when:
- The crust is golden brown
- The loaf sounds hollow when tapped underneath
- The internal temperature reaches approximately 190°F (88°C)
Proper baking ensures a soft interior and a perfectly crisp crust.
Step 8: Cool Before Slicing
Remove the bread from the oven and transfer it immediately to a cooling rack.
Although it may be tempting to slice the loaf right away, allowing it to cool completely is important.
Cooling helps the bread finish setting internally and prevents the texture from becoming gummy.
Patience at this stage will reward you with cleaner slices and better texture.
Serving Suggestions
This green bread loaf can be enjoyed in countless ways.
Try serving it with:
- Butter
- Honey
- Cream cheese
- Strawberry jam
- Peanut butter
- Fresh fruit
- Tea or coffee
The loaf also makes excellent sandwiches thanks to its soft crumb and unique appearance.
Whether served sweet or savory, every slice delivers delicious flavor and eye-catching presentation.
Storage Instructions
Store the bread in an airtight container or bread bag at room temperature for up to three days.
For longer storage, slice the loaf completely and place the slices into freezer-safe bags.
Freeze for up to three months.
When ready to enjoy, simply toast the slices directly from frozen.
This makes the bread convenient for meal prep and busy mornings.
Helpful Baking Tips
For the best results, keep these tips in mind:
Always use bread flour whenever possible, as it provides better structure and chewiness.
Allow the dough enough time to rise fully. Proper proofing creates a lighter loaf.
Measure ingredients accurately to ensure consistent results.
Avoid slicing the bread while hot, as this can affect texture.
If using matcha powder, choose a high-quality variety for the most vibrant color.
Final Thoughts
This Easy Homemade Green Bread Loaf is the perfect combination of creativity, flavor, and comfort. Its vibrant green interior, fluffy texture, and golden crust make it a true showstopper that stands out from traditional bread recipes.
Whether you’re baking for your family, preparing content for your food blog, or simply experimenting with colorful baking ideas, this recipe is guaranteed to impress. Every slice offers softness, freshness, and visual appeal that turns ordinary bread into something memorable.
Once you experience the aroma of this loaf baking in your kitchen and see its stunning green crumb after slicing, you’ll understand why so many home bakers love this unique bread. It’s easy to make, fun to serve, and absolutely delicious from the very first bite.