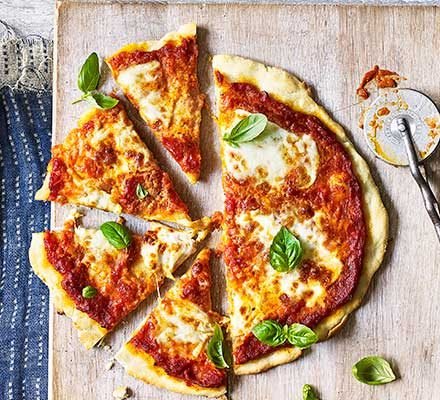

This Homemade Gluten-Free Sourdough Pizza has a crisp, golden edge, a tender center, and plenty of sourdough flavor. It’s made without wheat and uses an active gluten-free sourdough starter instead of commercial yeast. The dough is easy to prepare and can be customized with your favorite sauce, cheese, vegetables, or meats.
Recipe Overview
- Prep Time: 25 minutes
- Fermentation: 6–12 hours
- Cook Time: 12–18 minutes
- Total Time: About 7–13 hours
- Servings: 2 medium pizzas
- Cuisine: Italian-inspired
- Diet: Gluten-Free
Ingredients
For the Gluten-Free Sourdough Pizza Dough
- 1 cup (240 g) active gluten-free sourdough starter
- 1 ½ cups (210 g) gluten-free all-purpose flour blend
- ½ cup (70 g) tapioca starch
- 1 tablespoon psyllium husk powder
- 1 teaspoon fine sea salt
- 1 tablespoon olive oil
- 1 teaspoon honey or maple syrup
- ¾ cup (180 ml) warm water
- 1 teaspoon apple cider vinegar, optional
Important: Make sure every ingredient, including the flour blend, is certified gluten-free if you need to avoid gluten strictly.
For the Pizza Sauce
- ¾ cup (180 g) crushed tomatoes
- 1 tablespoon tomato paste
- 1 tablespoon olive oil
- 1 small garlic clove, finely minced
- ½ teaspoon dried oregano
- ½ teaspoon dried basil
- ¼ teaspoon salt
- ¼ teaspoon black pepper
- Pinch of red pepper flakes, optional
Toppings
- 2 cups shredded mozzarella cheese
- Fresh mozzarella, optional
- Sliced bell peppers
- Mushrooms
- Red onion
- Black olives
- Fresh basil
- Cooked chicken, pepperoni, or other preferred toppings
Instructions
1. Prepare the Psyllium Gel
Start by adding 180 ml warm water to a small bowl.
Sprinkle in the psyllium husk powder while whisking continuously.
Let the mixture sit for about 5 minutes.
It should turn into a thick gel. This step is especially important in gluten-free sourdough because psyllium helps replace some of the structure that gluten normally provides.
2. Mix the Dry Ingredients
In a large mixing bowl, combine:
- Gluten-free flour
- Tapioca starch
- Salt
Whisk everything together until evenly distributed.
Tapioca starch helps create a softer and slightly stretchy texture while also helping the crust brown nicely.
3. Add the Wet Ingredients
Add the active gluten-free sourdough starter, olive oil, honey, apple cider vinegar if using, and psyllium gel.
Mix with a sturdy spatula until a soft dough forms.
The dough will look and feel different from traditional wheat pizza dough. It should be soft, slightly sticky, and pliable, rather than elastic.
If the dough seems very dry, add water 1 tablespoon at a time.
If it seems excessively wet, allow it to rest for 5–10 minutes before adding more flour because the psyllium will continue absorbing moisture.
4. Knead the Dough
Use your hands to gently knead the dough for approximately 2 minutes.
You don’t need to knead it like traditional pizza dough because there is no gluten to develop.
Simply make sure everything is thoroughly combined.
Shape the dough into a ball.
5. Ferment the Dough
Cover the bowl tightly with plastic wrap, a lid, or a reusable cover.
Leave it at room temperature for approximately 6–12 hours.
The exact fermentation time depends on:
- Temperature of your kitchen
- Strength of your sourdough starter
- Hydration of your starter
- Flour blend
- Desired sourdough flavor
The dough may not double like regular wheat sourdough. Instead, look for a slightly expanded dough with some airiness and a pleasant fermented aroma.
For Overnight Pizza
You can mix the dough in the evening and allow it to ferment overnight.
If your kitchen is warm, use a shorter fermentation time to prevent over-fermentation.
6. Prepare the Pizza Sauce
While the dough ferments, prepare the sauce.
Add the crushed tomatoes, tomato paste, olive oil, garlic, oregano, basil, salt, pepper, and red pepper flakes to a bowl.
Mix well.
There’s no need to cook the sauce beforehand.
Taste and adjust the seasoning according to your preference.
7. Preheat the Oven
For the best pizza, you want a very hot oven.
Place a pizza stone or pizza steel inside the oven if you have one.
Preheat to 475–500°F (245–260°C) for at least 30–45 minutes.
A properly heated pizza stone or steel helps the bottom of the crust become crisp.
If you don’t have one, use a heavy baking sheet turned upside down.
8. Divide the Dough
Once fermentation is complete, divide the dough into 2 equal portions.
Lightly dust your work surface with gluten-free flour or tapioca starch.
Form each portion into a ball.
Let the dough rest for about 10 minutes before shaping.
9. Shape the Pizza
Place one dough ball on a sheet of parchment paper.
Lightly oil your hands.
Gently press the dough outward from the center.
Shape it into a round pizza approximately 10–12 inches wide.
Keep the edges slightly thicker to create a crust.
Because this dough is gluten-free, don’t try to stretch or toss it like traditional pizza dough. Pressing it gently is much easier and prevents cracking.
If the edges crack, simply press them back together with your fingers.
10. Add the Sauce
Spread approximately ⅓–⅓ cup pizza sauce over the dough.
Leave about ½ inch around the edges for the crust.
Don’t use too much sauce. Excess moisture can make gluten-free pizza crust soft in the center.
11. Add the Cheese and Toppings
Sprinkle mozzarella evenly over the sauce.
Add your favorite toppings.
Some great combinations include:
Classic Margherita
- Mozzarella
- Fresh basil
- Tomato
- Olive oil
Chicken & Vegetable
- Cooked chicken
- Bell peppers
- Red onion
- Mozzarella
Mushroom & Garlic
- Mushrooms
- Mozzarella
- Garlic
- Fresh herbs
Spicy Pizza
- Pepperoni
- Mozzarella
- Jalapeños
- Red pepper flakes
Try not to overload the pizza with toppings because a heavy topping layer can prevent the center from cooking properly.
12. Bake
Carefully transfer the pizza, still on the parchment paper, onto the preheated pizza stone or baking steel.
Bake for approximately 10–15 minutes.
The exact time depends on your oven and the thickness of the crust.
The pizza is ready when:
- The edges are golden brown
- The cheese is bubbling
- The bottom is crisp
- The center is cooked through
For an extra golden top, switch the oven to broil for the final 1–2 minutes, keeping a close eye on it.
13. Cool Slightly and Serve
Remove the pizza from the oven.
Let it rest for 3–5 minutes before slicing.
Finish with:
- Fresh basil
- Parmesan
- Olive oil
- Red pepper flakes
- Freshly ground black pepper
Slice and serve warm.
How to Get a Crispy Gluten-Free Sourdough Crust
A crispy crust depends heavily on moisture and oven temperature.
Use a Pizza Stone or Steel
A preheated stone or steel gives the dough an immediate blast of heat and helps crisp the bottom.
Preheat Properly
Don’t rush this step.
Give your oven and baking surface at least 30–45 minutes to heat thoroughly.
Don’t Add Too Much Sauce
Too much tomato sauce can make the center soggy.
Use a thin, even layer.
Avoid Excess Toppings
Keep toppings relatively light.
This allows the heat to reach the crust more effectively.
Bake Immediately After Shaping
Once the pizza is assembled, get it into the hot oven rather than allowing it to sit for a long time.
Can You Make the Dough Ahead?
Absolutely.
After fermentation, the dough can be refrigerated in an airtight container.
For the best flavor, use it within 24–48 hours.
Take it out of the refrigerator approximately 30–60 minutes before shaping so it can soften slightly.
Gluten-free dough can sometimes become firmer when chilled, so allowing it to warm up makes shaping easier.
How to Store Leftover Pizza
Allow leftover pizza to cool completely.
Place slices in an airtight container and refrigerate for up to 3–4 days.
For longer storage, wrap individual slices and freeze for up to 2 months.
How to Reheat Gluten-Free Sourdough Pizza
For the crispiest results, reheat slices in a skillet over medium-low heat.
Cover the skillet loosely and heat for several minutes until the bottom becomes crisp and the cheese melts.
You can also use an air fryer at approximately 350°F (175°C) for 3–5 minutes.
Avoid microwaving if you want to preserve the crispy crust.
Troubleshooting
Why is my crust too crumbly?
The dough may not have enough hydration or psyllium.
Add water gradually when mixing the dough and make sure you’re measuring the psyllium accurately.
Why is my pizza soggy?
The most common causes are too much sauce, too many toppings, or an oven that isn’t hot enough.
Use less sauce and toppings and make sure the pizza stone or steel is thoroughly preheated.
Why didn’t my dough rise?
Gluten-free sourdough doesn’t always rise dramatically.
Your starter may also need more time to become active.
Make sure your gluten-free starter is bubbly and has a pleasant fermented smell before using it.
Why is the crust hard?
Overbaking is usually the main reason.
Gluten-free pizza can lose moisture quickly, so remove it from the oven as soon as the edges are golden and the center is cooked.
Nutrition Information
Approximate nutrition per serving will depend heavily on the flour blend, cheese, sauce, and toppings.
For one half of a pizza without additional meat toppings, expect approximately:
- Calories: 450–550
- Protein: 15–20 g
- Carbohydrates: 65–75 g
- Fat: 15–20 g
- Fiber: 3–5 g
These numbers are estimates and will vary based on the specific ingredients used.
Frequently Asked Questions
Is sourdough pizza gluten-free?
Sourdough itself isn’t automatically gluten-free. To make gluten-free sourdough pizza, you need a gluten-free sourdough starter and gluten-free ingredients throughout the recipe.
Can I use gluten-free sourdough discard?
Yes, but active starter generally provides better fermentation and texture. If using discard, you may need to adjust the fermentation time and potentially add another leavening method.
Can I make this pizza dairy-free?
Yes. Replace mozzarella with your favorite dairy-free pizza cheese or use a combination of vegetables, herbs, and olive oil without cheese.
Can I make the crust thinner?
Yes. For a thin and crispy pizza, press the dough slightly thinner before adding the toppings. Just be careful not to make it so thin that it becomes difficult to transfer.
Does gluten-free sourdough pizza taste sour?
It can have a mild tangy flavor, especially when the dough is fermented for a longer period. The flavor will depend on your starter and fermentation time.
Final Thoughts
Homemade Gluten-Free Sourdough Pizza is absolutely worth making from scratch. The crust has a delicious fermented flavor while the tapioca starch and psyllium help give it a flexible, satisfying texture.
The key is to use an active gluten-free starter, give the dough enough fermentation time, and bake the pizza in a very hot oven. Once you’ve made the basic dough, you can turn it into endless pizza combinations—from classic Margherita to spicy chicken, roasted vegetables, mushrooms, or your favorite homemade toppings.