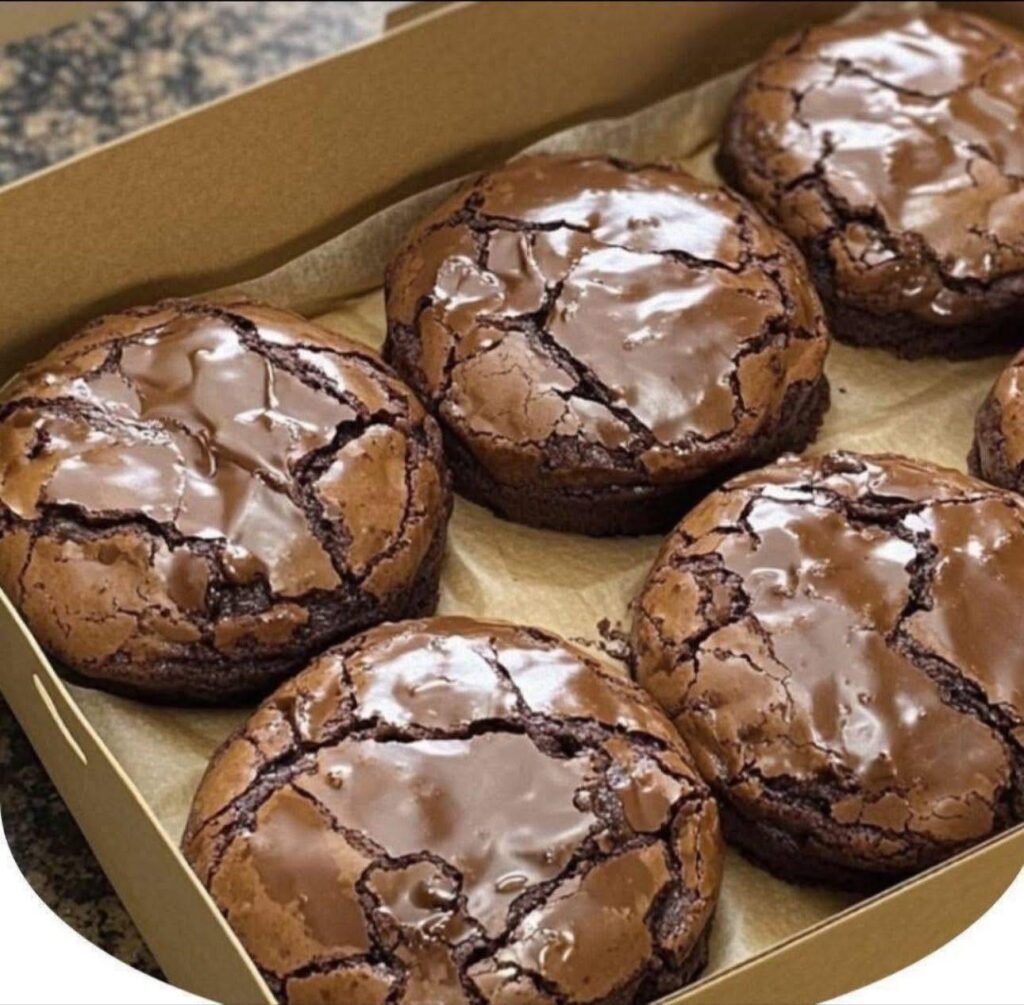
There’s something irresistible about a perfectly baked fudgy brownie. With its rich chocolate flavor, dense texture, and melt-in-your-mouth center, a good brownie is one of the most satisfying desserts you can make at home. If you’re looking for a recipe that delivers bakery-quality results with minimal effort, these Sourdough Fudgy Brownies are exactly what you need.
Made with sourdough discard, dark chocolate, cocoa powder, butter, and a combination of white and brown sugar, these brownies are packed with deep chocolate flavor and a luxurious fudgy texture. Unlike cakey brownies, which can sometimes resemble chocolate cake, these brownies are dense, chewy, and incredibly moist. Every bite is loaded with rich chocolate goodness that chocolate lovers simply can’t resist.
One of the best things about this recipe is that it provides a delicious way to use up leftover sourdough discard. Instead of throwing away excess starter, you can transform it into a decadent dessert that your family and friends will absolutely love. The sourdough discard adds subtle complexity to the flavor without making the brownies taste sour.
Whether you’re baking for a family gathering, special occasion, or simply satisfying a chocolate craving, these brownies are guaranteed to become one of your favorite recipes.
Why You’ll Love These Sourdough Fudgy Brownies
These brownies stand out because they have everything a great brownie should offer: a shiny crackly top, a rich chocolate flavor, chewy edges, and a soft fudgy center.
The combination of melted dark chocolate and cocoa powder creates a deep chocolate intensity that is far superior to brownies made with cocoa powder alone. The butter adds richness, while the extra egg yolk contributes to a smooth and gooey texture.
Another advantage is their simplicity. You don’t need an electric mixer or any complicated equipment. Everything can be mixed by hand in just a few bowls, making cleanup easy and the baking process stress-free.
Ingredients
For the Brownies
- 170 grams dark chocolate (60–70% cocoa), chopped
- 115 grams unsalted butter
- 200 grams granulated sugar
- 100 grams brown sugar
- 2 large eggs
- 1 extra egg yolk
- 1 teaspoon vanilla extract
- 1 teaspoon fine sea salt
- 65 grams all-purpose flour
- 25 grams unsweetened cocoa powder
- ½ cup sourdough discard
Equipment Needed
To make these brownies, you’ll need:
- 8×8-inch baking pan
- Parchment paper
- Heatproof bowl
- Mixing bowls
- Whisk
- Rubber spatula
- Sharp knife
One of the great things about this recipe is that no electric mixer is required. Hand mixing helps maintain the dense and fudgy texture that makes these brownies so special.
Step 1: Prepare the Baking Pan
Begin by preheating your oven to 350°F (175°C).
Line an 8×8-inch baking pan with parchment paper, leaving some overhang on the sides. This makes it much easier to lift the brownies out after baking. Lightly grease the parchment paper with butter or non-stick spray.
Preparing the pan properly ensures easy removal and cleaner slices later.
Step 2: Melt the Chocolate and Butter
Place the chopped dark chocolate and butter into a heatproof bowl.
You can melt them using either a double boiler or a microwave. If using a microwave, heat in 20-second intervals, stirring after each interval until the mixture becomes completely smooth.
The finished mixture should look glossy, silky, and lump-free.
Allow the mixture to cool for about 3 to 5 minutes before adding the eggs. This prevents the eggs from scrambling when they are mixed into the batter.
Step 3: Add the Sugars
Once the chocolate mixture has cooled slightly, add both the granulated sugar and brown sugar.
Whisk thoroughly until combined.
The warm chocolate mixture helps dissolve the sugars, which contributes to the shiny, crackly top that brownie lovers adore.
At this stage, the batter may appear slightly grainy. This is completely normal and will smooth out as more ingredients are added.
Step 4: Incorporate the Eggs and Flavorings
Add the eggs one at a time, whisking well after each addition.
Next, add the extra egg yolk, vanilla extract, and sea salt.
Whisk vigorously for about 30 seconds.
This step is extremely important because it helps create structure while also contributing to the glossy brownie surface. The batter should become thick, smooth, and shiny.
You’ll notice that it begins to look rich and luxurious—exactly what you want for fudgy brownies.
Step 5: Add the Sourdough Discard
Stir the sourdough discard into the batter until fully incorporated.
The discard blends beautifully into the chocolate mixture and adds a subtle depth of flavor. It won’t make the brownies taste sour; instead, it enhances the overall richness and complexity.
This is also an excellent way to reduce food waste while creating something incredibly delicious.
Step 6: Fold in the Dry Ingredients
In a separate bowl, sift together the flour and cocoa powder.
Sifting helps remove lumps and ensures even distribution throughout the batter.
Gradually sprinkle the dry ingredients over the wet mixture.
Using a rubber spatula, gently fold everything together until no streaks of flour remain.
Be careful not to overmix.
Overmixing develops gluten, which can make brownies more cake-like. For the ultimate fudgy texture, mix only until combined.
The batter will be thick, rich, and incredibly chocolatey.
Step 7: Bake the Brownies
Pour the batter into the prepared baking pan.
Use a spatula to spread it evenly into the corners and smooth the surface.
Place the pan into the preheated oven and bake for 22 to 28 minutes.
Since every oven is slightly different, start checking around the 22-minute mark.
The brownies are ready when:
- The top appears shiny and crackly.
- The edges look set and slightly firm.
- The center remains slightly soft.
- A toothpick inserted into the middle comes out with moist crumbs attached.
If the toothpick comes out completely clean, the brownies may be slightly overbaked. They will still taste delicious, but the texture will be less fudgy.
Step 8: Cool Completely
Remove the brownies from the oven and allow them to cool completely in the pan.
This step is often the hardest because the aroma is so tempting.
However, cooling is essential for developing the perfect fudgy texture.
As the brownies cool, they continue to set and become denser.
Allow at least one hour of cooling time before slicing.
For even cleaner cuts, refrigerate the brownies for 30 minutes after they have cooled to room temperature.
Step 9: Slice and Serve
Use the parchment paper overhang to lift the brownies from the pan.
Place them on a cutting board and use a sharp knife to cut into squares.
For bakery-style slices, wipe the knife clean between cuts.
Serve the brownies as they are, or pair them with:
- Vanilla ice cream
- Fresh berries
- Whipped cream
- Chocolate sauce
- Caramel drizzle
Storage Tips
Store the brownies in an airtight container at room temperature for up to four days.
For longer storage, refrigerate them for up to one week.
The flavor actually becomes even richer after a day or two, making them an excellent make-ahead dessert.
Freezing Instructions
These brownies freeze beautifully.
Wrap individual brownie squares tightly in plastic wrap and place them in a freezer-safe container.
Freeze for up to three months.
When ready to enjoy, simply thaw at room temperature or warm slightly in the microwave.
Tips for Perfect Fudgy Brownies
- Use high-quality dark chocolate.
- Do not overmix the batter.
- Avoid overbaking.
- Allow brownies to cool completely before slicing.
- Use room-temperature eggs for smoother mixing.
- Measure ingredients accurately for consistent results.
Final Thoughts
Sourdough Fudgy Brownies are the perfect dessert for anyone who loves rich, intense chocolate flavor and an ultra-fudgy texture. The combination of dark chocolate, cocoa powder, butter, and sourdough discard creates a brownie that is incredibly moist, dense, and indulgent. With a shiny crackly top and a gooey center, these brownies rival anything you would find in a professional bakery.
Whether you serve them warm with ice cream, enjoy them with a cup of coffee, or pack them for an afternoon treat, these brownies are guaranteed to satisfy every chocolate craving. Once you try this recipe, it will quickly become a favorite in your baking collection.